
Table of Contents
What is the LIMITS command in AutoCAD?
If you do not set the limit of the drawing, you can still draw the drawing but then you need to change the other things accordingly like text size and dimension, etc. Even you can set the size of paper like A4 by using the LIMITS command which helps you in printing the drawing later on.
Steps for drawing limits in AutoCAD
-
Open AutoCAD: Launch AutoCAD and open the drawing file you want to work on or create a new one.
-
Access the Command Line: At the bottom of the AutoCAD window, you’ll see a command line where you can type commands. Click here to activate it.
-
Use the “LIMIT” Command:
- Type “LIMIT” and press Enter.
- AutoCAD will prompt you to specify the first corner of your drawing limit. Click a point on your drawing where you want one corner of the limit to be.
- Next, AutoCAD will ask you to specify the opposite corner of your drawing limit. Click another point to define the opposite corner.
- After defining the second corner, press Enter to confirm your selection.
-
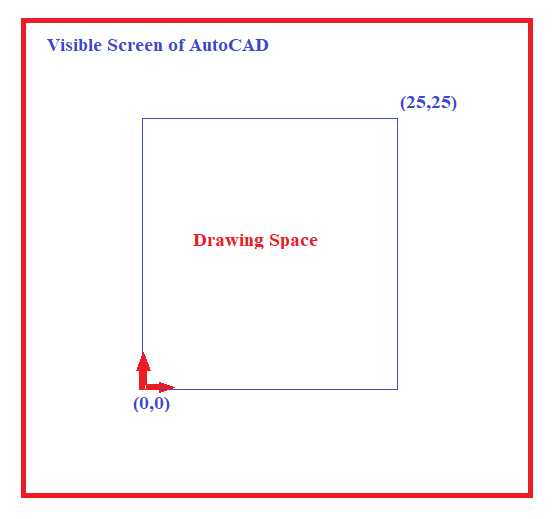
Drawing Limit Set: You have now set a drawing limit, and AutoCAD will display a rectangular border to represent this limit. Everything you create or edit should stay within this boundary.
- Work within the Limit: You can start drawing, editing, and adding objects within the defined drawing limit. Any objects you create or modify should stay within this boundary.
By using the “LIMIT” command in this way, you ensure that your work remains organized and contained within the specified rectangular boundary, which can be especially helpful when working on precise designs or when preparing drawings for printing and plotting.
FAQs on drawing limits in AutoCAD
Why is setting drawing limitations in AutoCAD so important?
Setting drawing limitations in AutoCAD is crucial because it establishes the virtual confines for drawing creation and editing. It makes sure that your design stays inside precise and manageable boundaries.
How do the accuracy and precision of your AutoCAD drawings affect drawing limits?
By giving your design a frame of reference, drawing limits ensure accuracy and precision. If there are no restrictions, it’s simple to mistakenly produce objects that are the wrong scale or location.
What occurs in AutoCAD if drawing limits are not set?
You run the risk of producing chaotic, challenging, and prone to scale and positioning problems drawings if you don’t set drawing constraints.
How do AutoCAD drawing limitations affect printing and plotting?
The answer is that printing and charting both heavily depend on drawing constraints. They make sure that your drawings scale properly for the chosen print size and avoid cutting off or distorting any parts.
Can AutoCAD drawing limits be changed after a project has begun?
Yes, drawing limits can be changed at any moment in AutoCAD. However, setting them correctly at the start of a project is recommended practice to preserve consistency and prevent any problems in the future.
Video on drawing limits in AutoCAD